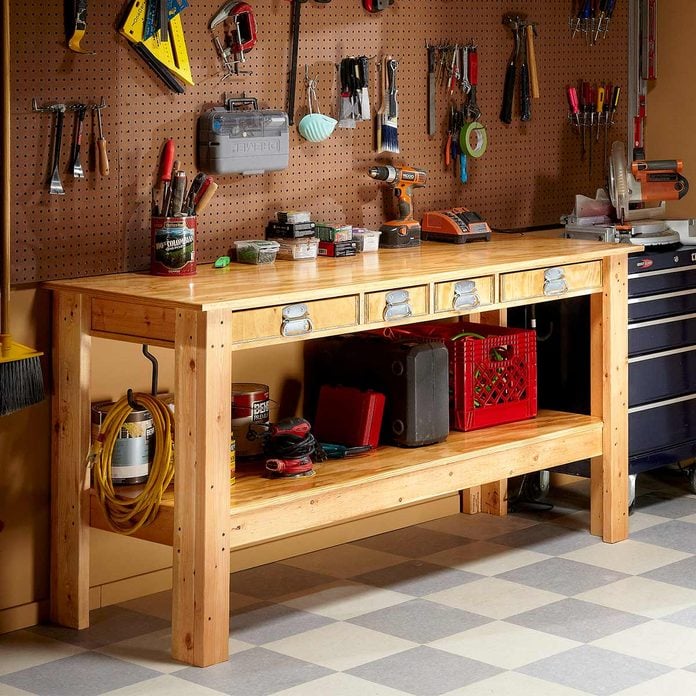

A well-constructed workbench is an indispensable asset for any garage, providing a dedicated space for projects, repairs, and crafting. Building your own workbench allows for customization to fit your specific needs and budget. This comprehensive guide outlines the process of creating a robust and functional workbench tailored for garage use.
1. Planning and Design:
Determine Size and Shape: Consider the size of your garage and the types of projects you will be undertaking. A larger workbench is suitable for more intricate work or multiple projects, while a smaller, more compact design may be appropriate for basic tasks.
Material Selection: Common choices for workbenches include lumber (pine, fir, or oak), plywood, and metal. Lumber offers a natural aesthetic and good strength, while plywood is more affordable and stable. Metal provides exceptional durability and resistance to wear. Choose materials that align with your budget and desired aesthetic.
Workbench Height: The ideal height for your workbench depends on your stature. A comfortable working height allows you to stand comfortably and work without strain. Generally, a height between 34 and 36 inches is suitable for most people.
Features and Accessories: Consider adding features like a vice, tool storage, drawers, shelves, or a pegboard for organization.
2. Materials and Tools:
Lumber: Choose high-quality lumber, free of knots and imperfections. Use 2x4s for the frame, 2x6s for the top, and 1x4s or 1x6s for support boards and shelves.
Plywood: Use ¾ inch plywood for the top of the workbench. Marine plywood provides superior water resistance and durability.
Fasteners: Use wood screws or bolts for secure connections. Countersink screws for a smooth surface.
Wood Glue: Use a quality wood glue for durable joints.
Finishing: Apply stain, paint, or polyurethane for a protective and aesthetically pleasing finish.
Tools: You will need basic carpentry tools including:
Saw (circular, table, or jigsaw)
Drill and bits
Screwdriver
Tape measure
Level
Clamps
Hammer
Safety glasses and gloves
3. Construction:
Building the Frame: Begin by constructing the frame using 2x4s. Cut the lumber to your desired dimensions and assemble using wood glue and screws. For added stability, use pocket holes or mortise and tenon joints.
Adding Supports: Install support boards or shelves to create additional storage space or to reinforce the frame. These should be attached to the frame using screws or bolts.
Creating the Worktop: Cut the plywood to the desired size and shape. Ensure the plywood is flat and free of warping. Attach the plywood to the frame using screws or bolts.
Finishing Touches: Apply a sealant or protective coating to the workbench. Choose a finish that is compatible with your materials and desired aesthetic.
4. Additional Features:
Vice: A vice is essential for secure clamping of workpieces. Choose a vice appropriate for the size and weight of the items you will be working on. Attach the vice to the workbench using screws or bolts.
Tool Storage: Integrate storage solutions like drawers, shelves, or a pegboard for organizing your tools.
Lighting: Adequate lighting is crucial for safe and efficient work. Install overhead lighting or a workbench lamp.
5. Customization and Personalization:
Worktop: Customize your worktop with a layer of melamine for increased durability and easy cleaning. Consider adding a protective layer of epoxy for even greater protection.
Accessories: Add additional accessories like power strips, tool holders, or work surface organizers.
6. Safety Considerations:
Wear safety glasses and gloves: Always protect your eyes and hands when working with power tools or sharp objects.
Secure the workbench: Ensure the workbench is securely anchored to the floor to prevent accidental tipping.
Keep a clean workspace: Clear clutter and spills to prevent accidents.
Conclusion:
Building your own workbench is a rewarding project that allows you to create a custom workspace tailored to your specific needs. By following these guidelines and using high-quality materials, you can build a sturdy and functional workbench that will serve you well for years to come. Remember, a well-designed and organized workbench can enhance your productivity, reduce frustration, and make your garage a more enjoyable space for work and creativity.


